
Have you ever wondered how users engage with your website? Whether users are clicking the right buttons or calls to action are working properly, Tealium IQ's Link tracking Extension allows you to track user clicks and gain valuable insights into your website's performance.
Before you begin:
Once you've completed these steps, you're ready to start tracking user clicks with Tealium IQ's Link tracking Extension.
The Link Tracking extension provides a general link tracking solution for your website.It runs in the DOM Ready scope and cannot be changed.
Note: You are only allowed to add the Link Tracking extension once.
1. First, navigate to the Tealium IQ interface and click on Extensions.
2. Click “Add Extensions”

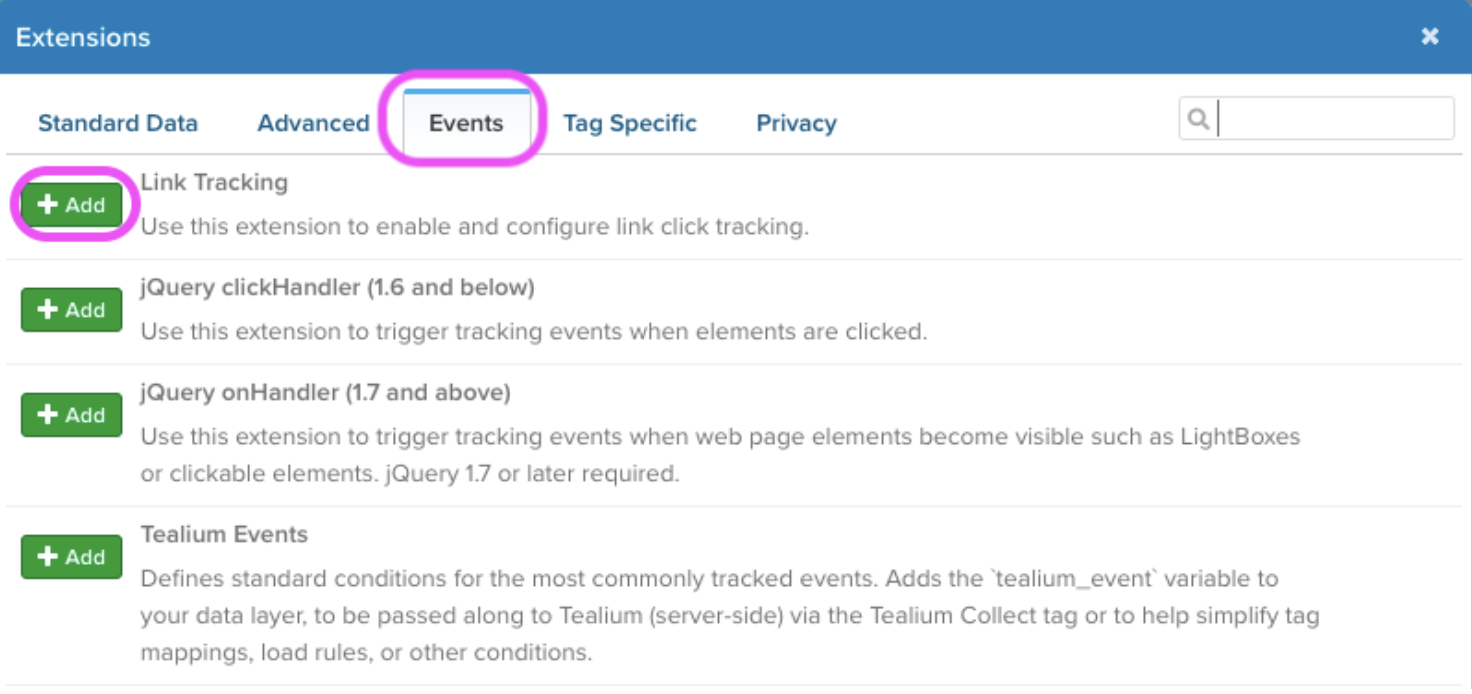
3. On the window, Click Events then +Add to create the extension.

4. Complete the following configurations:

Every click will have the following output:
1. To access the Tag Marketplace, click 'Tags' followed by 'New Tag' on the left side of the screen.
2. Let's find Google Analytics 4! Search for 'Google Analytics4 (gtag.js)' and click 'Next'.

3. Configure the tag.

4. Click Next.
5. Set Load Rules: Load rules determine when your tag should fire.In this example, we want the tag to trigger whenever a user clicks on a link or a button.
Remember: The Link tracking extension captures the following information on each link or button click:

Since the event_name in the Link tracking extension matches the event_name output, we'll create a load rule based on event_name.
To create the load rule, click “+Add rule”


When all done, drag the load rule to the Rules and Events field:

6. Click Next.
To send the cta_click event to Google Analytics4 (GA4), you'll need to map the event_name variable to a destination. This will ensure that the event data is sent correctly to your GA4 property.
If you want to send additional parameters along with the event, you'll need to map those variables as well. For example, you might want to send the link_url or link_text variables to provide more context about the clicked link.
1. Click the variable dropdown then search for event_name:

2. Configure Event Triggers:
[1] In the Trigger field,type "cta_click."
[2] Select "Custom Event" from the Event dropdown. This indicates that "cta_click" is a custom event, not a standard GA4 event.
[3] Enter "cta_click" in the Custom Name field. The value you enter here will appear as the event name in your GA4 reports.

3. Click “+Add”. You should see the mapping just like this:

4. Now we map the parameter link_text to a custom dimension. Click on the Variable dropdown again then search for link_text. Click “+Add mapping”

5. Configure Event Specific Parameters:
[1] In the Parameters field, type "clicked_text."
[2] Select "Custom Event" from the Event dropdown.
[3] Enter "cta_click" in the Custom Event field.
Remember to create a custom dimension named "clicked_text" in your Google Analytics 4 user interface. This will allow you to track and analyze the text of the clicked links in your GA4 reports.Follow the instructions in this guide.

6. Click “+Add” then click “Done”.
Let’s test if the tag is working! There are a lot of ways we can test if this is working but I prefer to use a tool called Analytics Debugger by David Vallejo.
First, let’s make sure that the changes are published to the prod environment.
Whenever there are changes in Tealium IQ, the Save button on the upper right turns orange.

Click Save / Publish then provide the following:
Version name.

You can leave this as is.
Notes:

It would be helpful to add in notes like the summary of the changes.
Publish Location.
For this example, we’ll be publishing the changes to all three environments:

Click Publish.
Once published, let’s head over to the website.
First, check whether the latest version of Tealium IQ is in place. You can do this by using the Web Companion Extension.
Note: It may take some time for the latest version to take effect.
To enable the Analytics Debugger extension, open the developer console and look for the“Analytics Debugger” tab

Click “Start Debugging”!
On this test website, I’ll be clicking on the Signup button on the upper right.
We will be looking at the “GA4” tab of the AnalyticsDebugger tool. We should see the cta_click event as well as its parameters.

It will take at least 48 hours for the data to be processed in GA4.
Congratulations!You've successfully configured Tealium IQ's Link tracking extension to send click data to Google Analytics 4. By following these steps, you can gain valuable insights into user behavior on your website, optimize your content, and improve your overall digital marketing strategy.
